#AltDevBlogADay. I thought I’d start with a series of tutorials and articles taking you all through making a basic iPhone game, a basic pong game.
There are lots of basic iOS game tutorials but most just do the game part of the app.
For example this is a very good tutorial for beginners, but it is just the game view. So the game play starts as soon as you open the app.
The goal of this tutorial is to guide you through making the entire app rather then just parts of it.
We’ll cover:
- The Menus and non game parts of the app, using UIKit.
- Using Sparrow Framework, Open Source game engine.
- Mixing UI elements with Sparrow, i.e text input within the game view.
- Integrating OpenFeint, LeaderBoards & Achievements.
- Making it a universal app (standard, retina and iPad display within 1 binary).
- And the design and overall effect the game should give.
Half the post will be covering why we are choosing to do things the way we are and what other options are available.
And then we will dive into the code/tutorial part of the post, showing you how to actually do it.
Ok, so to start we will be: setting up the xcode project, adding Sparrow’s library to it, adding OpenFeint’s library to it, and doing all the initial setup for the project, and getting everything to play nicely with each other so it’ll actually compile.
Sparrow Framework
Game Engines save you time by letting you think about the game mechanics rather then the actual calls to OpenGL as well as allowing you to benefit from all the optimising and debugging others have done to the library already.
The available options for a free open source game engine are (that I’ve been able to find):
The reason we are using Sparrow is because it is very light weight, fast and has an initiative API that is easy to learn.
Cocos2D is an Objective C port of a python game engine and has a quite cryptic syntax to look at and try to make sense of without documentation or examples to look at.
And Canabalt went Open Source.
There are probably others too but google searches for Sparrow Framework, paid engines and 3D game engines.
OpenFeint
OpenFeint lets you easily add various features to your app to make it better, such as leader boards, achievements and other social features.
The other advantages of OFX) for your app as well as a web uploader to add new in app purchases without releasing an update to the AppStore, especially helpful if your game is a big file size to download.
And there is iPhone app that features a free app and an on sale app everyday. The main reason this is helpful though is just how powerful it is.
Another one of OpenFeint’s advantages is that since the release of GameCenter it has had the ability to integrate with it and submit the highscores to both its servers and the GameCenter’s. Using this also means that you can prove support for these features on the 1st and 2nd generation devices as well as sub 4.1 firmware.
The alternatives are:
Now I would compare them all….But I haven’t actually used any of them apart from OpenFeint yet so you’d have to do your own digging into what each one is like. Though all of them (apart from GC) seem to be effectively invite only so you have to apply to be given their SDK.
Tutorial
Ok, so now onto the tutorial half of the post. We are creating a pong clone for this, sorry I couldn’t come up with something more imaginative.
It’ll be a basic game with:
- Main Menu,
- Credits Page,
- Game View,
- Basic LeaderBoards,
- And a few simple achievements.
First we need to download everything from:
- Sparrow Download Link
- signup first)
Now create a new Universal (iPad & iPhone targeted) ‘Window-based Application’ in xcode and name it “Pong”.
First go into the Info.plist and at the bottom remove the 2 landscape orientations from the supported iPad orientations.
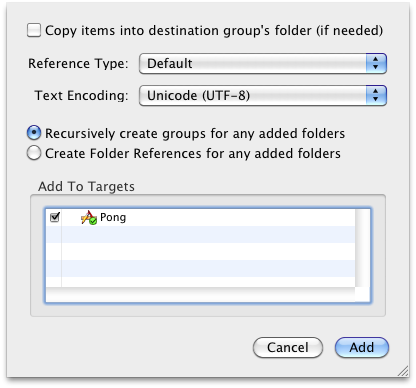
From the “Sparrow 1.1″ folder you just downloaded drag the ‘Classes’ folder from Sparrow_1.1/sparrow/src/ into the xcode window just above the ‘iPad’ group that should already be there.
Do the same again for the OpenFeint folder OpenFeint.x.x.x/OpenFeint.
Now you use Objective C for iPhone Apps but OpenFeint uses Objective C++. This isn’t a problem but you need to tell Xcode that’s what you’re using. The simplest way to do this is to name the files in which you use OpenFeint in to .mm, but as you haven’t done anything with it yet we don’t need to worry about that.
Another thing we need to do for Sparrow & OpenFeint is change some builds settings.
- Other linker Flags: -ObjC
- Call C++ Default Ctors/Dtors in Objective-C: true
These are in Project < Edit Project Settings < Build
Frameworks
Now we need to add all the required frameworks:
- Foundation
- UIKit
- AddressBook
- AddressBookUI
- AudioToolbox
- AVFoundation
- CoreGraphics
- CFNetwork
- CoreLocation
- MapKit
- OpenAl
- OpenGLES
- Security
- SystemConfiguration
- libsql3.0.dylib
- QuartzCore
- libz.dylib
Note not adding all the frameworks is the easiest way to get errors.
NOTE: As of OpenFeint 2.7 you have to add GameKit as well to avoid linking errors. However for compatibility with non GameCenter enabled devices it is advised to weak link it. To weak link, in the targets group, right click on your apps name and select ‘get info’ then change GameKit to weak from required.
Now in the _Prefix.pch file add a new line below everything else.
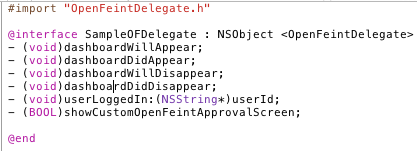
#import "OpenFeintPrefix.pch"We will also need to create 2 new files now, ‘SampleOFDelegate.h’ and ‘SampleOFDelegate.mm’ to handle major events from OpenFeint, really though you can leave all the functions empty.
You can download them if you want to save some time.
SampleOFDelegate.mm
SampleOFDelegate.h
Lastly, for OpenFeint at least, you need to start it in both AppDelegates. Which need to be changed to .mm file extensions now.
At the top of your AppDelegate.mm files first put.
#import “SampleOFDelegate.h”
And then add this code to the AppDelegate.mm
ApplicationDelegate_(BOTH).mm
- (void)applicationDidFinishLaunching:(UIApplication *)application {


          NSDictionary *settings = [NSDictionary dictionaryWithObjectsAndKeys:

                           [NSNumber numberWithInt:UIInterfaceOrientationPortrait], OpenFeintSettingDashboardOrientation,

                           [NSNumber numberWithBool:YES], OpenFeintSettingDisableUserGeneratedContent, nil];


          SampleOFDelegate *ofDelegate = [SampleOFDelegate new];

          OFDelegatesContainer* delegates = [OFDelegatesContainer containerWithOpenFeintDelegate:ofDelegate];

          [OpenFeint initializeWithProductKey:@"YOUR PROJECT KEY FROM OPENFEINT DEV SITE"

                                                            andSecret:@"YOUR SECRET KEY FROM OPENFEINT"

                                                   andDisplayName:@"APP NAME"

                                                          andSettings:settings    // see OpenFeintSettings.h

                                                     andDelegates:delegates]; // see OFDelegatesContainer.h


  }


  - (void)applicationWillResignActive:(UIApplication *)application {


        [OpenFeint applicationWillResignActive]; // Add for OpenFeint


  }


  - (void)applicationDidBecomeActive:(UIApplication *)application {


        [OpenFeint applicationDidBecomeActive]; // Add for OpenFeint


  }


  - (void)applicationWillTerminate:(UIApplication *)application {


        [[NSUserDefaults standardUserDefaults] synchronize]; // Add for OpenFeint


  }
All this code does is tell OpenFeint when the app changes state, backgrounded or brought back into an active state. First though it starts up OpenFeint itself with some settings you can set, like the interface’s orientation.
Now the last parts. Open App_Delegate_iPad.h:
Put “-(IBAction)LaunchOpenFeint;” just above the @end.
So now you need to put it in the .m file as well like this.
-(IBAction)LaunchOpenFeint{

        [OpenFeint launchDashboard];

  }
The code here is mostly self explanatory.
IBAction is equivalent to ‘void’ in that it doesn’t return anything. The IB part of IBAction means Interface Builder and it basically just tells interface builder that it should notice that function and be able to link buttons to that action.
Open MainWindow_iPad.xib and:
- Drag a UILabel and UIButton over from the Library at the left of the screen over into the UIWindow.
- Change the Status Bar to ‘none’.
- Change the Label’s text to ‘Hello iPad” in a very big font.
- Change the text of the button to “Launch OpenFeint Dashboard”.
In the the MainWindow_*.xib box click on the AppDelegate.

Now in the Attributes window (on the right), open the connections tab (the second tab).
Drag the launchOpenfeint action’s circle and connect it to the button you created, select ‘Touch Up Inside’
Save and close the XIB file.
Lastly Repeat those steps for the iPhone version.
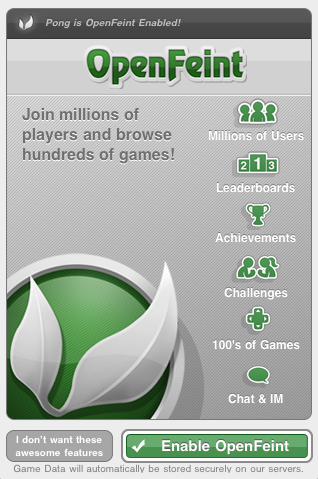
Now if you ‘Build & Go’ for the simulator you should be presented with the active OpenFeint screen, and then your app’s welcome message and that is it for part 1.
Coming In Part 2
In the next part we’ll cover designing the menus a UI. Compare a few examples of the menus and UI setup in a few popular iOS games. And setting up a Sparrow View so we can actually get started on the game part.
To read the original article and tutorial:
http://iky1e.tumblr.com/post/2855939592/tutorial-complete-ios-game-part-1