#altdevblogaday post and the second part of my Complete iOS Game Tutorial.
For the second part of my iOS game tutorial series, we’ll be covering the UI design and setting up sparrow itself.
UI Design
If you have a spectacular, smooth, glossy UI that users adore your app will standout because of it. However difference for the sake of being different isn’t always a good thing, so think about your reason for doing things differently and what the benefits to your approach are first.
So for our menu we will use a quite basic layout:
- play button;
- settings button;
- about button;
- credits button;
- launch OpenFeint button.
All positioned one below the other.
Oh that sounds really boring! :(
Yes put like that it does but you’ll see that good graphics and cool animations can GREATLY improve the whole experience of an app.
+ that’s what everyone else does
Tutorial
First you’ll need to download the graphics here.
Add the files to your project through xcode and we are ready to start.
- Open your Info.plist file;
- Rename ‘Icon File’ to ‘Icon Files’;
- Now add all the icon files 1 per row to the list;
- Add 2 new rows called ‘Launch Image (iPhone)’ and ‘Launch Image (iPad)’;
- Add ‘Default.png’ and ‘Default-iPad.png’ to them.
Now we need to make the main menu itself.
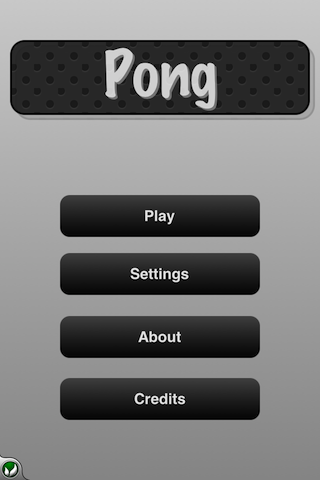
Double click on MainWindow_iPhone.xib to open Interface builder, here’s a picture of what we what.

We need to drag 5 UIButtons from the library window into the UIWindow.
Put the first one in the button left corner. Set its: type to “Custom”; Size to 57 * 57; And Background to the OFIconBottomSmall.png that you downloaded in the graphics zip file.
Change the button’s text color to White and in the Info section of the Inspector change the class to ‘CustomButton’ for all the other buttons. Set their titles and positions as you like.

Drag over 2 UIViews and a UILabel, set the UILabel to “Pong” and put it in one of the views. Set the label’s text color to White. But a standard label is boring so change it’s shadow color to light grey also Horizontal and Vertical Offset to +2.
Change the 2 Views Size + Positions to:
W: 300; H: 75;
Y: 40; X: 10;
Offset the one without the Label in it (which should also be behind the other one) by 5 X and 5 Y, to get the slight shadow effect we want.
Change those 2 UIViews to Class “PatternView”.
Lastly, for now anyway, add a big UIView (320px*480px) behind everything else and set that’s Class to “CoolWhiteView”.
Now you’ve probably seen all the custom class names we are using and so now we actually need to create those custom classes’s files.
You’ve also have noticed how few images there were in the download compared to how many seemed to be in the screenshot posted above, that’s because we’ll mostly be using CoreGraphics rather than extra images.
Thanks to Core Graphics Tutorials, which quite a bit of the following uses stuff from.
Save and add these files to your xcode project.
Now the changes, I’ve added LOTS of comments so hopefully you can see what’s going on without much extra explanation.
AppDelegate_iPhone.h
#import "PatternView.h"

  #import "Sparrow.h"

  #import "Game.h"

  #import "CustomButton.h"

  #import "CoolWhiteView.h"
To the top of AppDelegate_iPhone.h
Add this to the @interface declaration
SPView *sparrowView;

          Game *game;

          IBOutlet CoolWhiteView *backgroundView;


          IBOutlet PatternView *titleView;

          IBOutlet PatternView *titleViewShadow;


          IBOutlet CustomButton *playButton;

          IBOutlet CustomButton *settingsButton;

          IBOutlet CustomButton *aboutButton;

          IBOutlet CustomButton *creditsButton;

          IBOutlet UIButton *OpenFeintButton;
And this to the bottom of the file under the first @property
@property (nonatomic, retain) IBOutlet SPView *sparrowView;


  //Little Setup Functions

  -(void)styleCustomViews;


  //Buttons

  -(IBAction)playPressed:(id)sender;

  -(IBAction)settingsPressed:(id)sender;

  -(IBAction)aboutPressed:(id)sender;

  -(IBAction)creditsPressed:(id)sender;


  -(IBAction)LaunchOpenFeint;


  //Other Functions

  -(void)zoomIntoGame;
Here we are just declaring all the methods and properties we will be using in the .m file.
Now the changes to the AppDelegate_iPhone.m file.
AppDelegate_iPhone.m
the top of the file should now be like.
//Private Interface (i.e other objects can't use these).

  @interface AppDelegate_iPhone ()

  -(void)removeImage:(UIImageView*)imageView;

  @end

  //Private Interface End


  @implementation AppDelegate_iPhone


  @synthesize window, sparrowView;
- (BOOL)application:(UIApplication *)application didFinishLaunchingWithOptions:(NSDictionary *)launchOptions {


          [self styleCustomViews];


          //Start Sparrow (sort of)

          CGRect sparrowFrame = CGRectMake(0, 0, window.frame.size.width, window.frame.size.height);

          sparrowView = [[SPView alloc] initWithFrame:sparrowFrame];

          [SPStage setSupportHighResolutions:YES];


          //..the rest of the code..... and at the bottom


          //Create an image view with the launch image in it.

          UIImageView *loadingImage = [[UIImageView alloc] initWithImage:[UIImage imageNamed:@"Default.png"]];

          [window addSubview:loadingImage]; //Add the UIImageView to the screen

          [self removeImage:loadingImage]; //Start the image fading out.

  }


  -(void)removeImage:(UIImageView*)imageView{

          //statis means that every time this function is called it will still use the same boolean not a new one.

          static BOOL preRun = NO; // this sets 'have i been used before' to NO.


          //If this is the first call made to this function, fade the ImageView out

          if (!preRun) {

                  preRun = YES; //A call to this function has now been made.

                  //Begin the Animtions

                  [UIView beginAnimations:@"FadeOut" context:nil];

                  [UIView setAnimationDuration:1.5];        //How long it lasts

                  imageView.alpha = 0;                                //What it'll actually do

                  [UIView commitAnimations];                        //Start the animation

                  //Tell 'self': to do something later; when; and what object to send itself.

                  [self performSelector:@selector(removeImage:) withObject:imageView afterDelay:1.5];

          }


          // If the fadeout stuff has already been run do this

          else if (preRun) {

                  NSLog(@"Removing Image View");

                  [imageView removeFromSuperview]; //Remove the imageView from screen

                  [imageView release]; //Remove the imageView from memory as well

          }

  }
-(void)styleCustomViews{

          //*** Custom Styling Settings ***//

          titleViewShadow.layer.masksToBounds = YES;

          titleViewShadow.layer.borderWidth = 2.0f;

          titleViewShadow.layer.cornerRadius = 15.0f;

          /**** Style the title view ****/

          titleView.layer.masksToBounds = YES;

          titleView.layer.borderWidth = 2.0f;

          titleView.layer.cornerRadius = 15.0f;

          titleView.layer.borderColor = [UIColor blackColor].CGColor;


          //Activate Custom Styling on the buttons

          [playButton activate];

          [settingsButton activate];

          [aboutButton activate];

          [creditsButton activate];

  }


  -(IBAction)playPressed:(id)sender{

          //Start The animation

          [self zoomIntoGame];

  }


  -(IBAction)settingsPressed:(id)sender{

          //We haven't got a settings page yet

  }


  -(IBAction)aboutPressed:(id)sender{

          //We haven't got an about page yet

  }


  -(IBAction)creditsPressed:(id)sender{

          //We haven't got a credits page yet

  }


  -(IBAction)LaunchOpenFeint{

          //Launch OpenFeint

          [OpenFeint launchDashboard];

  }


  -(void)zoomIntoGame{

          [UIView beginAnimations:@"Slide In" context:nil];

          [UIView setAnimationDuration:0.1]; //Very Short Animation

          playButton.frame = CGRectOffset(playButton.frame, -10, 0); //Move left first

          settingsButton.frame = CGRectOffset(settingsButton.frame, 10, 0); //Move right left

          aboutButton.frame = CGRectOffset(aboutButton.frame, -10, 0); // Move left first

          creditsButton.frame = CGRectOffset(creditsButton.frame, 10, 0); //Move right first

          OpenFeintButton.alpha = 0; //OpenFeint Button disappear

          [UIView commitAnimations];


          //Only calculate the distance to move buttons off screen once.

          int slideRight = (playButton.frame.origin.x+window.frame.size.width);

          int slideLeft = -(playButton.frame.origin.x+window.frame.size.width);


          //Begin Animation Settings//

          [UIView beginAnimations:@"Slide Out" context:nil];

          [UIView setAnimationDuration:0.6]; //A Longer Animation

          [UIView setAnimationDelay:0.1]; //Only start when the Other animation is finished

          playButton.frame = CGRectOffset(playButton.frame, slideRight, 0); //Now slide off screen the other way

          settingsButton.frame = CGRectOffset(settingsButton.frame, slideLeft, 0); //Slide the other way

          aboutButton.frame = CGRectOffset(aboutButton.frame, slideRight, 0); //Slide Off Screen

          creditsButton.frame = CGRectOffset(creditsButton.frame, slideLeft, 0); // Slide Off Screen

          //Fade out buttons

          playButton.alpha = 0; //Fade out as they are moving

          settingsButton.alpha = 0; //Fade as they are moving

          aboutButton.alpha = 0; //Fadeout

          creditsButton.alpha = 0; //Fadeout

          [UIView commitAnimations];

          //Start the Animation//


          //Begin Animation Settings//

          [UIView beginAnimations:@"Fade Out" context:nil];

          [UIView setAnimationDuration:0.25];

          [UIView setAnimationDelay:0.5]; //Start as the others are finishing.

          titleView.alpha = 0; //Fade them out

          titleViewShadow.alpha = 0; //Fadeout

          [UIView commitAnimations];

          //Actually Start the Animation//


          //Begin Animation Details//

          [UIView beginAnimations:@"Zoom in" context:nil];

          [UIView setAnimationDelegate:self];

          [UIView setAnimationDuration:0.75];

          [UIView setAnimationDelay:0.75];

          backgroundView.alpha = 0;

          [UIView setAnimationDidStopSelector:@selector(AddGameView)];

          [UIView commitAnimations];

          //Begin Animation details//

  }


  -(void)AddGameView{

          SP_CREATE_POOL(pool);

          [SPAudioEngine start];

          //Start the Sparrow Stage and add it to the screen

          game = [[Game alloc] initWithWidth:320 height:480];

          sparrowView.stage = game; //Add to sparrow

          [sparrowView start]; //Start Sparrow

          SP_RELEASE_POOL(pool);


          [window addSubview:sparrowView]; //Add it to screen

  }


  //Also update the appDelegate methods

  - (void)applicationWillResignActive:(UIApplication *)application {

          [OpenFeint applicationWillResignActive];

          if (sparrowView.stage != nil){

                  [sparrowView stop];

          }

  }

  - (void)applicationDidEnterBackground:(UIApplication *)application {

          if (sparrowView.stage != nil){

                  [sparrowView stop];

          }

  }

  - (void)applicationWillEnterForeground:(UIApplication *)application {

          if (sparrowView.stage != nil){

                  [sparrowView start];

          }

  }

  - (void)applicationDidBecomeActive:(UIApplication *)application {

          if (sparrowView.stage != nil){

                  [sparrowView start];

          }

          [OpenFeint applicationDidBecomeActive];

  }
Lastly add [sparrowView release]; to the top of the dealloc method.
Now all we’ve done here is create the definitions for the methods we added to the .h file and then file them. With the code to fade the loading screen out nicely. And the code to animate the interface out of the way as we enter the game itself. (Read through the comments to see what the each line of code is doing).
Lastly
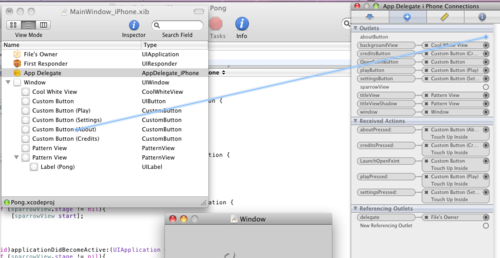
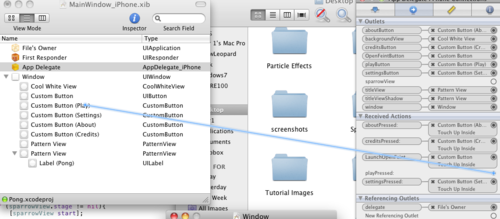
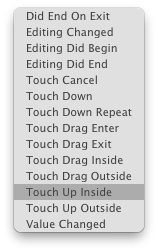
Lastly, as we have created all the methods for the buttons and made them (play button at least) do something, we now need to head back into Interface Builder and connect the views, buttons and button actions up to the different interface components.


Now save everything, do a ‘Build & Go’ in Xcode and you should see the nice interface we looked at a screenshot of earlier.
However when you click on ‘Play’ you’ll get the nice animation and then a Red square in the middle of the screen. The reason for this is because at the moment we are using the standard ‘Game’ class files. We haven’t actually done anything in sparrow yet. The red square is there just so you can see sparrow is setup and working.
Coming In Part 3
- Actually making the game part of it in sparrow.
- Some basic AI, using texture atlas’s, etc….
- Using a singleton class to handle the settings and game saves.
- Making the other pages (so all the buttons open something).