Playtesting is a great way to tune gameplay. It can provide insightful feedback which can be applied to provide a superior experience. However there may be some valuable information that is not articulated through interviews, because its not something the player is conscious of. By recording their encounters and then analyzing them new observations can be made which can further enhance the game.
In this series of articles we’ll be developing a web site that gathers gameplay data, processes it and then visualizes it. It is structured as a primer on Django, and explores many of its features. This knowledge can then be leveraged when analyzing your own game.
The Problem
Suppose we’re working on a RPG. One of the things we want to keep track of is a player’s progress through the various quests in the game. The data we’d like to glean is how many players encountered the quest, how many finished it, and how long it took to finish it. This information will give us some insight as to how well the quest is received.
Introducing Django
Django is an open-source web framework written in Python. The benefit of using a web framework is its handling of the more mundane aspects of web development, such as communicating with a database. This frees the developer to focus on the functionality of the site, speeding up its development. As you’ll see over the course of the series there isn’t a whole lot of code to get the site up and running.
One of the great things about Django is its site.
Building the Site
Width Django installed we can begin creating the web site. In Django terminology a web site is made up of one or more projects. A project is a collection of applications, which will be introduced shortly, all sharing the same database and settings. To start a project the django-admin.py script is used.
django-admin startproject gameanalytics
This call creates a gameanalytics directory and three files of interest. The fourth file, __init__.py, is a Python convention for marking directories as a Python package and will be found in multiple places in the application. Its normally an empty file so we’ll be ignoring it for the duration.
- manage.py – A utility we’ll be using to perform various tasks in the web application.
- settings.py – A script containing various configuration options, such as the database
connection. - urls.py – The URL mappings for the application.
The next step is to create an application within the project. The way applications are used within a project is similar to an Entity System. Each application provides a single set of self-contained functions, and the combination of them defines the behavior of the project.
python manage.py startapp game
This command creates the game directory and three files of note.
- models.py – Defines the data being stored.
- tests.py – Contains unit tests.
- views.py – Defines functions that will be called during URL requests.
Architecturally Django follow the Model-View-Controller pattern as evidenced through its naming scheme. Django refers to its variant as Model-Template-View. In terms of mapping between the two the View can be thought of as the Controller, which contains the business logic, the Template corresponds to the View, which handles the presentation, and the Model is just that, the data.
Modeling the Game Data
We’ll begin development by opening models.py and defining our data.
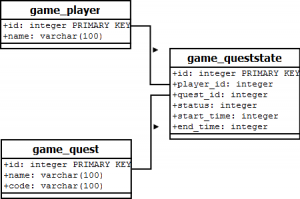
from django.db import models class Player(models.Model): name = models.CharField(max_length=100) class Quest(models.Model): name = models.CharField(max_length=100) code = models.CharField(max_length=100, unique=True) class QuestState(models.Model): DECLINED_STATUS = 1 ACCEPTED_STATUS = 2 COMPLETED_STATUS = 3 QUEST_STATUS = ( (DECLINED_STATUS, 'Declined'), (ACCEPTED_STATUS, 'Accepted'), (COMPLETED_STATUS, 'Completed') ) player = models.ForeignKey(Player) quest = models.ForeignKey(Quest) status = models.IntegerField(choices=QUEST_STATUS, null=True) start_time = models.IntegerField(null=True) end_time = models.IntegerField(null=True) |
Django provides Object-Relational Mapping, which translates between the Object-Oriented data model and the underlying relational database. This functionality is contained in the Model class which our classes descend from in order to access.
The individual fields expressed in the class definition correspond to fields within the database. The full listing of potential fields can be found in the documentation. Each of them can take additional arguments which allow for more control of the underlying data. In our example we created an enumeration for the quest status, and allowed it to contain a null value.
A quick aside about fields. It is possible in Django to create custom fields. In this example the start and end time contain an integer which will represent the number of seconds of playtime. From there we’ll create a timedelta object. We could skip this step by providing a custom field that works directly with a timedelta, but as this is a more advanced feature we’ll forgo this. For those interested the documentation provides an example.
Before we can create the database schema we need to configure the database connection. This is specified in settings.py within the application root. Django supports PostgreSQL, mySQL, Oracle and SQLite out of the box. For our purposes we’ll use SQLite which requires no configuration on our end, as Python has built-in support for it. When deploying to a web server this will need to be modified accordingly.
DATABASES = { 'default': { 'ENGINE': 'sqlite3', 'NAME': 'test.db3', 'USER': '', 'PASSWORD': '', 'HOST': '', 'PORT': '', } } |
Additionally we need to register our application within the project. Page down to the bottom of settings.py and modify the INSTALLED_APPS, adding the application to the listing.
INSTALLED_APPS = ( 'django.contrib.auth', 'django.contrib.contenttypes', 'django.contrib.sessions', 'django.contrib.sites', 'django.contrib.messages', 'gameanalytics.game', ) |
Now we can create the database using manage.py.
python manage.py syncdb
During execution the script will prompt you to create a superuser. This account allows you to access the admin panel. Create an account as we’ll be accessing it later.
Within the root of the application the database file, test.db, should be present. To examine the underlying schema a tool like SQLiteBrowser can be used. This can be used to examine how our models map to the database.
The Admin Interface
Next we’ll enable the admin site so we can create some data. First we need to uncomment the admin component in settings.py. Next we modify urls.py enabling the three lines related to the admin site.
Now we can startup the site. Django provides a built-in web server that can be used during development. It is started by, you guessed it, manage.py.
python manage.py runserver
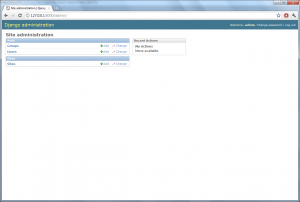
Login to the admin site by navigating to http://127.0.0.1:8000/admin. Afterwards your screen should look like this.
Here you can add additional logins, but that’s about it currently. To access our data we need to register it with the admin component. Create admin.py and modify it as follows to hook it into the admin panel.
from django.contrib import admin from models import * admin.site.register(Player) admin.site.register(Quest) admin.site.register(QuestState) |
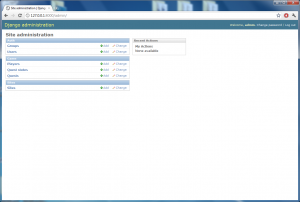
Restart the web server and refresh the web page to see our models.
Through this interface we can create, read, update and delete data. By using introspection on the models the admin panel generates forms to do all these tasks. It even manages to populate a list box with the names of our enumeration!
Adding Data in Bulk
If we have quite a bit of information to import then adding it all through the admin panel can become tedious. This is where fixtures come into play.
A fixture is simply a JSON, or YAML, file that maps to a model. Create a fixtures folder within the component and add the following to intial_data.json. Here we’ll add some quests.
[ { "model": "game.quest", "pk": 1, "fields": { "name": "Fetch my slippers", "code": "FET0001" } }, { "model": "game.quest", "pk": 2, "fields": { "name": "Make me a sammich", "code": "FET0002" } } ] |
When running the syncdb command any data in initial_data.json will be automatically loaded. You may have caught the line “No fixtures found” the last time you ran the command. This file not being present was what it was referring to. Run the command again and you should see the data in the admin panel.
Fixtures can also be used to add some test data. Create a file called player_data.json in the fixtures directory.
[ { "model": "game.player", "pk": 1, "fields": { "name": "The Nameless One" } }, { "model": "game.player", "pk": 2, "fields": { "name": "Morte" } } ] |
This can then be added to the database via manage.py.
python manage.py loaddata player_data
Up Next
In the next article we’ll add the ability to upload and parse a log file as we continue development of the analytics site.


