Welcome to the 3rd part of the series I’m doing on a Low Level Curriculum for C/C++.
This one is about the Stack, which is arguably the most important component of the underlying “engine” of C/C++. If you only ever bother to learn about one aspect of the low level behaviour of C/C++, then my advice is to make that one thing be the Stack.
You probably won’t need to have read the first two parts of this series to follow this article, but I will assume that you have – and I definitely assume that you do not fear the disassemby window.
In case you want to go back and read them here are links to the first two articles:
- /2011/11/09/a-low-level-curriculum-for-c-and-c/
- /2011/11/24/c-c-low-level-curriculum-part-2-data-types/
Prologue
If you are a C++ programmer and you’re not 100% sure what the Stack is or how it works, then you are not alone.
The Bjible
Bjarne Stroustrup’s book “The C++ Programming Language (3rd edition)” – which is pretty much the standard text on C++ (at least until the update for the C++11 standard is published…) – does not discuss what the stack is or how it works; although it does refers to data or objects being “on the stack” as if the reader knows what this means.
The closest you get to concrete information about the Stack in the Bjible is the following paragraph in a section in Appendix C entitled “C.9 Memory Management”…
“Automatic memory, in which function arguments and local variables are allocated. Each entry into a function or a block gets its own copy. This kind of memory is automatically created and destroyed; hence the name automatic memory. Automatic memory is also said ‘‘to be on the stack.’’ If you absolutely must be explicit about this, C++ provides the redundant keyword auto .”
Don’t get me wrong, this is still a very very good book (and one I refer to fairly often), but the fact that the standard text on C++ all but ignores something as core to the internal operation of C++ as the Stack is telling indeed. In my experience, this is symptomatic of the disconnect between programming language and underlying implementation that exists in the academic mindset.
On my Computer Science degree the concept of the Stack was covered in a couple of slides during a compulsory 1st year module called “Computer Systems and Architecture”, but never specifically with relation to the programming languages we were learning – and this, dear reader, is why I feel compelled to write about it…
What is the Stack?
Unsurprisingly, the Stack is a stack data structure. For the sake of clarity I’m going to capitalise the Stack to discriminate it from just any old instance of a stack data structure.
In a single threaded program the Stack contains the vast majority of the data relating to the current execution state of the program and all non-global “automatic” memory under the control of the compiler – i.e. local variables, function parameters etc.
When you put a breakpoint in your code in your IDE of choice and use the Call Stack window to discover the stack of function calls that got you to your breakpoint, the data used to populate that window was almost certainly derived by the debugger from examining the state of the Stack.
The detailed specifics of the way the Stack functions varies from CPU to CPU, machine to machine, compiler to compiler, and even with the same compiler and different compiler options (more about that in the next post!).
Broadly speaking, each time a new function is called:
- the current CPU execution state (i.e. the instantaneous values of CPU registers) is backed up into the Stack so it can be reinstated later,
- some or all of the parameters expected by the function being called are put into the Stack (many implementations use registers for parameter passing when possible), and
- the CPU jumps to a new location in memory to execute the code of the called function.
In the generalised case then, the Stack includes the following information:
- all of the local variables and function parameters of the functions below the top of the call stack,
- copies of the contents of all the CPU registers that were in use in each function below the top of the call stack when the call to the function above it was made,
- the memory address of the next instruction to execute in each of the functions below the top of the call stack when the function above them returns (the “return address”).
The area of Stack that contains the local variables belonging to a function (and any other data it might happen to put there) is said to be that function’s Stack Frame. This is an important term, don’t forget it!
Clearly the operation of the Stack is massively important to the execution of your code, and hopefully it is now obvious why something as easily done as writing outside of the bounds of an array declared as a local inside a function can cause such an epic fail – the out of bounds write is very likely to overwrite a function’s return addess or some other value crucial to the correct running of the program once the current function returns.
How does the Stack work in practice?
To help answer these questions let’s consider a (very simple) C/C++ program:
1 2 3 4 5 6 7 8 9 10 11 12 | int AddOneTo( int iParameter ) { int iLocal = iParameter + 1; return iLocal; } int main( int argc, char** argv ) { int iResult = 0; iResult = AddOneTo( iResult ); return 0; } |
I will be stepping through this program as a win32 console application built using VS2010 in a debug configuration with more or less the default compiler and linker settings, and the screenshots in this article will reflect this.
I would definitely advise doing this yourself by hand after reading this article because it’s always much more instructional to muddle through something like this yourself than it is to just read it…
As I mentioned earlier, the detailed specifics of the operation of the Stack – especially with regards to passing parameters to functions – will depend on the compiler options you use. The differences are mostly down to a set of code generation standards that are called “calling conventions”, each convention has its own rules about how parameters are passed to functions and how values are returned. Some tend to be faster, some tend to be slower, but most are designed to meet specific requirements for passing data – such as C++ member function calls, or variable numbers of parameters (e.g. printf() ).
The default calling convention used by VS2010 with C-style functions (i.e. no ‘this’ pointer) is known as stdcall, and since we’re looking at a debug build the disassembly we’re looking at will be using entirely un-optimised stdcall. This calling convention puts everything on the Stack other than return values from functions which are returned via the eax register.
If you are runningthis code on non wintel hardware, then the operation and organisation of the Stack in the code generated by your compiler, and the way parameters are passed will almost certainly be subtly – or even markedly – different from what I’m showing you in my debugger here, but the fundamental mechanisms by which it works should be basically the same.
Setting up
To start with, make an empty win32 console project, create a new .cpp file in it (I’d call it main.cpp if I were you), and then paste the above code into it.
Next, open up the project settings and make sure you have the “run time checks” option set to “default”. This not only makes the debug code (a lot) faster, but also simplifies the assembler it generates substantially – especially in the case of our very simple program. The image below shows you what the options dialog should look like after you make the change.
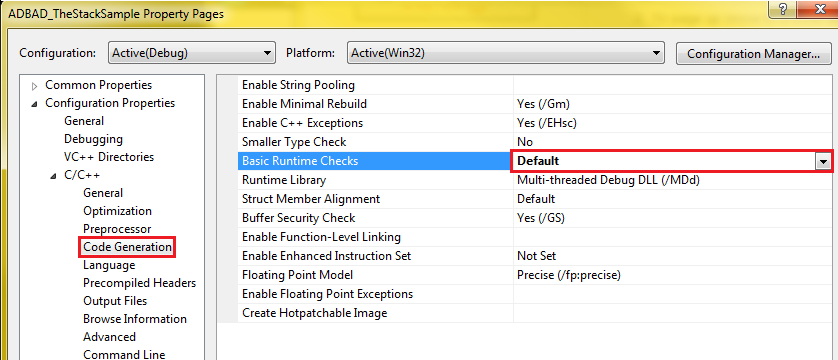
important areas higlighted in red for good measure!
Put a breakpoint on line 7 (yes, I know this line is the definition of main()) and then compile and run a debug build. When the Breakpoint gets hit, right click the source window and choose “Go To Disassembly”.
You should now be seeing something like this (n.b. the addresess of the instructions down the left edge of the window will almost certainly be different in your disassembly window):
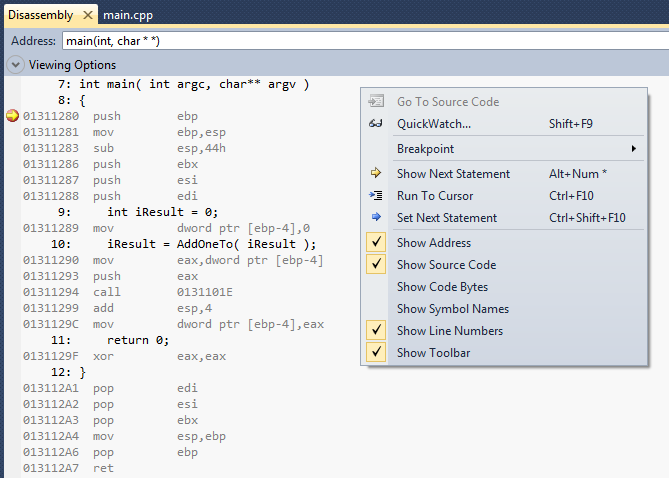
n.b. make sure you have the same display options checked in the right-click menu
DON’T PANIC
Clearly this is significantly more daunting than the disassembly we have looked at before so, before going any further, let’s cover a little background on the way that the Stack is managed in compiler generated 32bit x86 assembler (at least by the VS2010 C++ compiler with the default compiler and linker settings).
Before we begin…
The first piece of information that will start to make sense of this is that two key CPU registers are usually involved in the management of Stack Frames in 32bit x86 assembler:
- esp – or the Stack Pointer register which always points to the “top” of the Stack, and
- ebp – or the Base Pointer register which points to the start (or base) of the current Stack Frame.
Local variables are typically represented as offsets from the ebp register, in this case iResult is stored at the address [ebp-4].
If you want to see the local variable names rather than offsets from ebp you can right-click and check the “Show Symbol Names” option, but knowing that offsets from ebp are negative is useful.
Why are the offsets from ebp of local variables negative? This is because the x86 Stack grows downwards in memory – i.e. the “top” of the stack is stored in a lower memory address than the “bottom”. Consequently, the address stored in ebp is higher than the address in esp, and so local variables within the stack frame have negative offsets from ebp (and would have a positive offset from esp).
I’m pretty sure that every machine I’ve worked with has had a stack that grows down rather than up in address space, but as far as I know there’s no Universal Law of Computers that says that the Stack must do this – I’m sure there must be machines that have stacks which grow the opposite way.
Whilst this sounds counter-intuitive, having a stack that grows downward in memory address makes sense when considered in terms of the traditional overall memory layout of C / C++ programs, which we’ll cover in a later article in the series dealing with memory.
Push and Pop
As I’m sure you all already know, the two key operations of the abstract data structure known as a stack are to push something onto the top of it (covering the previous top), or to pop whatever is on the top off it (exposing the previous top).
Unsurprisingly the x86 instruction set has a push and a pop instruction, each of which take a register operand:
- push decrements esp by the size of its operand and then stores that operand into the address pointed to byesp (i.e. on the top of the Stack).
- This means that after a push instruction, the value at the address esp points to whatever was pushed onto the Stack.
- pop copies the value from the address contained in esp into its operand and then increments esp by the size of its operand so that its operand is essentially removed from the Stack.
These behaviours are key to the way in which the Stack operates.
How the Stack looks before our code executes
As I’m sure most of you know there is code that runs before main(). This code is responsible for all sorts of system initialisation, and when it’s finished it calls main() passing the command line arguments as parameters.
Let’s look at the layout of the Stack at the point just before the first instruction in main() is executed – in the diagram below I have called the function that calls main() “pre-main()” – you will probably find that the name of the actual function in your program’s call stack is a scary looking combination of underscores and capitalised acronyms.
This diagram will make more sense when you come back to look at it after reading the rest of the article.
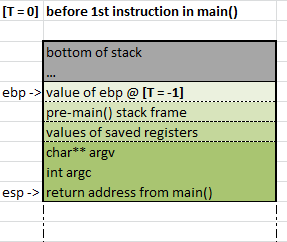
the state of the Stack before our code executes
The Function Preamble (or Function Prologue)
Before the disassembly even gets as far as assigning 0 to iResult we have a fair amount of assembler for what looks like nothing at the C/C++ level; so let’s make sense of it.
1 2 3 4 5 6 7 8 | 7: int main( int argc, char** argv ) 8: { 01311280 push ebp 01311281 mov ebp,esp 01311283 sub esp,44h 01311286 push ebx 01311287 push esi 01311288 push edi |
A block of assembler very similar to this will be at the start of every compiler generated function, and is usually referred to as the function’s “preamble” or “prologue”.
The purpose of this code is to create the stack frame for the function, and to store the content of any registers the function is going to use so that those values can be reinstated before the function returns:
[n.b. line numbers used in points below refer to the numbers in the code box above]
- line 3: is storing the current value of ebp on the Stack using the instruction push.
- line4: is moving the current value of esp to ebp. ebp now points straight to the old value of ebp that was just pushed onto the stack.
- line 5: is subtracting 44h (68 in decimal) in place from the value esp. This has the effect of allocating 68bytes on the Stack after ebp.
- line 6, 7, and 8: are storing the values contained in the ebx, esi, and edi registers respectively by pushing them onto the stack. This is because the assembler in main() makes use of these registers and needs to be able to restore them to their old states before it returns. Note that each push instruction will decrease the value of esp by 4 bytes.
N.B. If you’re following this in the debugger, then I would advise that you open a “Registers” window in your debugger to watch the values of the registers change as you single step through the disassembly. You would probably also do well to have memory windows open so you can point them at esp and ebp to watch the values change in memory (to get a memory window in VS2010 to track a register you will need to click the “Reevaluate Automatically” button to the right of the “Address:” edit box and then type the register’s name into the edit box).
At this point, the Stack looks like this:
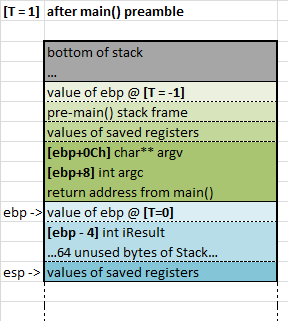
state of the Stack after preamble of main()
A couple of things to note about these Stack snapshot diagrams:
- The value T in the top left of these snapshots is used to identify old values of ebp stored in the Stack.
- Different colours are used to show which function is responsible for putting the data onto the Stack (and therefore for taking it off…).
- Different shades of the same colour represent different logical types of data put onto the stack by each function (i.e. base pointer, stack frame (locals), values of saved registers, and parameters /return addresses).
The function Postamble (or Epilogue)
Once the body of the function has finished executing, the Stack and registers need to be put back in the same state they were in before the function preamble so that the calling function can happily carry on excuting where it left off.
This is the job of the function postamble, or epilogue. The postamble simply does the logical opposite of the preamble – it pops whatever the preamble pushed, and reinstates the values that esp and ebp had before the preamble code executed.
In the code box below I’ve deleted the body of the function so that the preamble and postamble code are ajdacent. Looking at it like this it’s very clear that the postamble is doing the opposite of the preamble.
1 2 3 4 5 6 7 8 9 10 11 12 13 14 15 16 | 7: int main( int argc, char** argv ) 8: { 01311280 push ebp 01311281 mov ebp,esp 01311283 sub esp,44h 01311286 push ebx 01311287 push esi 01311288 push edi ... code representing the body of main() removed ... 12: } 013112A1 pop edi 013112A2 pop esi 013112A3 pop ebx 013112A4 mov esp,ebp 013112A6 pop ebp 013112A7 ret |
The only line in the preamble that doesn’t have a direct opposite in the postamble is line 5 (sub esp, 44h) – and that’s because assigning to esp from ebp in line 14 undoes lines 4 and 5.
Since all functions have a preamble and postamble, covering these two sections of the disassembly up front means we can essentially ignore the preamble and postamble from now on, and focus on the code that is different in each function.
And now: actual code we wrote!
Now we’ve covered the preamble and postamble we can concentrate on the body of main(), and how it calls the function AddOneTo().
This is the first bit of disassembly that directly correlates with the code that we can see at the C/C++ level.
1 2 3 4 5 6 7 8 | 9: int iResult = 0; 01311289 mov dword ptr [ebp-4],0 10: iResult = AddOneTo( iResult ); 01311290 mov eax,dword ptr [ebp-4] 01311293 push eax 01311294 call 0131101E 01311299 add esp,4 0131129C mov dword ptr [ebp-4],eax |
So, as we should all be familiar with from getting over our fear of disassembly line 2 in the above code is setting iResult, which we can see is within our current stack frame at adress [ebp-4] in the Stack.
The rest of the instructions are setting up to call the function AddOneTo(), calling it, and assigning to iResult from its return value.
- line 4: is moving the value of iResult into the eax register.
- line 5: is pushing the value of iResult from eax onto the top of the stack (which also decrements esp). This is storing a copy of the value of iResult on the stack as the function parameter to AddOneTo().
- line 6: is calling to address 0131101Eh. This instruction causes the function AddOneTo() to be called. It first pushes the address 01311299h onto the Stack (which is the memory address of the instruction at line 7), and then it jumps program execution to the instruction at 0131101Eh.
- line 7: When the function called by line 6 returns, the function parameter pushed onto the Stack in line 5 must be removed so the Stack state is as it was before AddOneTo() was called. To achieve this we add 4 to esp – this has the same effect on esp as pop, but we don’t care about the value so it makes sense to adjust esp directly. I assume this is also more efficient, but I’ve never looked into it.
- line 8: moves the value in eax into [ebp-4] where we know that iResult is stored. The standard “stdcall” convention for win32 x86 code specifies that eax is used to return values from functions so this line is assigning the return value of AddOneTo() to iResult.
Calling AddOneTo()
Let’s just review the instructions involved in calling AddOneTo() in detail:
9: int iResult = 0; 01311289 mov dword ptr [ebp-4],0 10: iResult = AddOneTo( iResult ); 01311290 mov eax,dword ptr [ebp-4] 01311293 push eax 01311294 call 0131101E |
- A copy of iResult’s value is pushed onto the stack (via eax) as the parameter for AddOneTo().
- push moves esp by 4 bytes (i.e. 32 bits) then stores its operand at that address, after the push instruction the value of iResult is stored in the address [esp].
- call pushes the address of the next instruction to execute after the function returns (the return address – 01311299h) onto the Stack, and then jumps execution to the address 0131101Eh.
- The copy of iResult’s value is now at [esp+4], and the return address is at [esp].
At this point, the Stack looks like this:
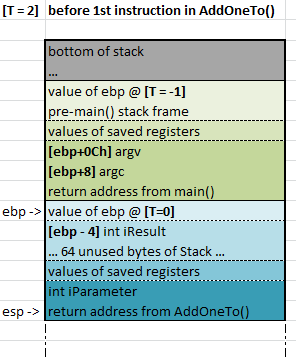
state of the Stack immediately after the call to AddOneTo() is made from main()
The code at the address 0131101Eh that has been called looks like this:
1 2 | AddOneTo: 0131101E jmp 01311250 |
I have to confess this is confusing. This instruction simply makes the code execution jump again, this time to the disassembly that represents the actual function body of AddOneTo(), which is at 01311250h. Why call to an instruction that does another jump?
If you step through this yourself, you’ll notice that the disassembly around this function appears to be a collection of goto style labels. This is because they are. You’ll also notice that the instructions associated with each label are jumping elsewhere. Clearly we’re looking at some sort of “jump table”.
The reason for this? Since I used the default debug configuration build settings; the option “Enable Incremental Linking” is set to “Yes”.
Incremental linking makes linking faster (apparently), but clearly introduces a small overhead to all function calls. This is the sort of thing you might possibly want to consider turning off in the build options – but you’d want to profile it to to make an informed decision as to its impact either way before doing so.
The jmp instruction doesn’t disturb the Stack, so no harm done really (other than the likely instruction cache miss introduced by the incremental link’s jump table).
Getting at the parameter passed to AddOneTo()
So, at last, we come to the disassembly of the body of AddOneTo():
1 2 3 4 5 6 7 8 9 10 11 12 13 14 15 16 17 18 19 20 21 | 1: int AddOneTo( int iParameter ) 2: { 01311250 push ebp 01311251 mov ebp,esp 01311253 sub esp,44h 01311256 push ebx 01311257 push esi 01311258 push edi 3: int iLocal = iParameter + 1; 01311259 mov eax,dword ptr [ebp+8] 0131125C add eax,1 0131125F mov dword ptr [ebp-4],eax 4: return iLocal; 01311262 mov eax,dword ptr [ebp-4] 5: } 01311265 pop edi 01311266 pop esi 01311267 pop ebx 01311268 mov esp,ebp 0131126A pop ebp 0131126B ret |
We’re already familar with the preamble (lines 3 to 8) and postamble (lines 16 to 20) which are identical to that of main().
Line 10 is much more interesting, as it gets the function parameter iParameter off the stack. Note the positive offset from ebp – this means that the address it is moving a value from into eax is outside this function’s stack frame.
As we established earlier, when we jumped to the address of this function, the address esp pointed to contained the return address, and a copy of the local variable iResult (i.e was stored at [esp+4].
The first instruction in the preamble is a push, which changes esp by a further 4 bytes; so immediately after line 3 the value of iResult – or iParameter as it is refered to in this function – is now at [esp+8].
The next instruction moves the value of esp into ebp, so the value of iReturn passed as a parameter to this function is now also at [ebp+8] – which is exactly where line 10 is accessing it from.
So now we know how arguments are passed to functions. Win!
Since this is the most data that this program ever puts on the Stack, we should take a look at a snapshot of the Stack so we can see exactly where everything is:
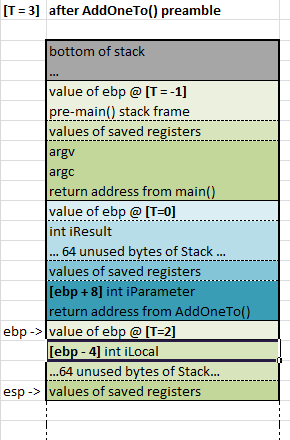
state of the Stack immediately after AddOneTo() preamble
Returning the result of AddOneTo()
Ignoring the function preamble, we are left with:
1 2 3 4 5 6 7 8 9 10 11 12 13 | 3: int iLocal = iParameter + 1; 01311259 mov eax,dword ptr [ebp+8] 0131125C add eax,1 0131125F mov dword ptr [ebp-4],eax 4: return iLocal; 01311262 mov eax,dword ptr [ebp-4] 5: } 01311265 pop edi 01311266 pop esi 01311267 pop ebx 01311268 mov esp,ebp 0131126A pop ebp 0131126B ret |
- Line 2 moves the value of iParameter from the Stack into eax.
- Lines 3 & 4 are adding one to the parameter value in eax and then moving the content of eax into the address at [ebp-4] which is the address of the local variable iLocal.
- Line 6 sets up the function’s return value by moving the value of iLocal into eax – which is where the stdcall calling convention specifies that return values go. If you remember, the code in main that accesses the return value expects it in eax.
If you’re paying attention you should have noticed that lines 4 and 6 are essentially redundant, since the return value was already in eax after line 3.
You will see this sort of thing all the time when looking at completely unoptimised disassembly - but it’s not a bad thing after all, when not asked to optimise the compiler’s task is to do exactly what your code has asked it to.
So the final piece of the puzzle in all this is actually returning from one function to another.
We know that the postamble puts the Stack back into the same state it was in immediately before the function’s preamble executed, well we already know what that looks like – because we have a digram of it at T=2:

state of the Stack immediately after the call to AddOneTo() is made from main()
The final ret on line 13 in the code box above causes the return address currently stored on the top of Stack by the call instruction in main() to be popped (adding 4 to esp) and resumes execution at that address – i.e. at the instruction immediately after the call in main().
Phew. There you have it. See, it wasn’t that bad was it?
Summary
In this article I’ve taken you through the disassembly of a simple program with a single function call with one parameter and a return value to demonstrate how the stack works.
The sample disassembly we looked at used the x86 stdcall calling convention, and whilst specifics of the disassembly generated to manage the stack will vary between calling conventions, the way the Stack works on any other machine or with any other calling convention should be very similar in principle.
If, for totally random example, you’re working with a platform that uses some variant of the IBM power PC CPU just fire up one of the simple SDK demos and step through the disassembly in a debug build. Whilst the disassembler mnenmonics will be (very) different, just spend a little while with a hardware manual and you should find that it’s doing pretty much the same thing as this x86 code we’ve just looked at.
You’re likely to find some significant variation relative to the x86 assembler we looked since the platform you’re working with almost certianly uses a different function calling convention – for example your compiler might mostly pass arguments via registers and only use the Stack when a function requires a large number of parameters, or uses var args (e.g. printf() ).
Either way, a quick flick through the hardware manuals and / or a search or two through the hardware / compiler manufacturer’s forums and newsgroups should tell get you the details of the calling convention you’re dealing with and enable you to get your head around it.
On top of this, the understanding you now have of the Stack’s mechanisms and data layouts should enable you to properly appreciate why out of bounds array access with local arrays can be so dangerous, and precisely why you should think very carefully before passing pointers to local variables…
Next Time…
Believe it or not, we’re not finished with the Stack – we have plenty more to cover about it!
For example:
- What happens when passing > 1 parameter?
- More detail on how local variables use Stack memory.
- How pass by value and return by value work.
- How some of the different x86 function calling conventions work – particularly __fastcall which is more similar to the calling conventions typically used by the ABIs (Application Binary Interface) for console platforms.
Given how long this article has become (and the time it took to write…), I will probably split these into more than one post.
Epilogue…
Assuming that you’ve run this code yourself in VS2010 then, if you have some spare time and fancy a bit of a shock, you may want to run this code in a release build configuration with the same breakpoint and look at the disassembly window when the breakpoint is hit.
I found the optimised code generated pretty interesting.
You may also find it fun to see what changes you need to make to the code to force the optimised code to keep the function call and local variables. I certainly did.
Thanks
I’d like to thank Bruce, Tiffany, Jonathan, Fabian, and Darren for their feedback on this article. It is definitely much better for it.